|
|

|
|
All use of my digital work is covered by this
Creative Commons Deed.
Please do not use any of my work for commercial purposes, thank you. |
|
|
|
|
2 Point Clipping (3 of 4)
|

|
|

|
|
|
|
|
 |
|
|
|
 |
|
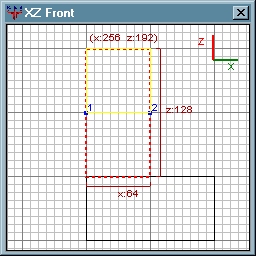
The next set of screenshots will use the Front view for
the 2D window. If you are following this article while
keeping up in the editor, then change the 2D window with
the cycle viewpoint keys "CTRL+TAB" until it looks like
the diagram to the side.
The clipper tool will always use the markers (blue dots) to
determine which side of the brush to discarded/cut.
Sometimes due to the way the markers are placed on the
2D window grid the cutting angle will be back to front.
ie. The wrong part of the brush will be discarded.
The initial solution to fixing this problem would be to move the
markers (blue dots) around until the correct side of the brush is
remaining. A far quicker way is to press "CTRL+ENTER" and the
clipper tool cut side will be reversed/mirrored.
|
|
|
|
|
 |
|
|
|
|
|
|
|
|
|
|
 |
|
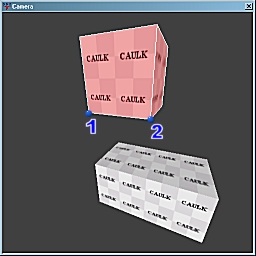
The clipper tool mirroring feature is a toggle which will
switch cutting sides everytime the key combination "CTRL+ENTER"
is pressed. The 2D/3D windows are also updated everytime
the cutting side is reversed.
When the editor is initally started the cutting side is set to
a default value. Each time the clipper tool is used, the
previous cutting side state is remembered. The only
way to change this state is by using the "CTRL+ENTER" key
combination or restarting the editor.
Before beginning the next example, make sure the mirror
feature is set back to the default. In the 2D window the
yellow section of the brush should be at the bottom and the
red at the top.
|
|
|
|
|
|
|
|
|
|
Moving Markers (Blue Dots)
|
|
|
|
|
|
|
|
|
|
|
|
 |
|
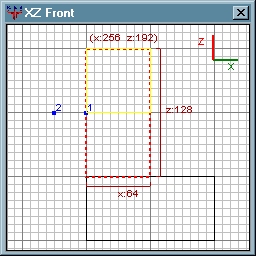
In the previous example the cutting side of the clipper
tool was reversed with a quick key combination. The
alternative method is to move the markers (blue dots)
manually instead.
Place the mouse cursor in the 2D window over a clipper tool
marker. (blue dot) When the mouse cursor changes to a
cross shape, the marker (blue dot) is ready to be moved.
Press and hold the Left Mouse Button (LMB) and then
gently drag the marker (blue dot) to a new location. When finished
moving the marker, just release the LMB.
To emulate the cut side mirror feature (talked about above)
move the second marker (blue dot) to the opposite side of the
first marker, (blue dot) like in the diagram to the side.
|
|
|
|
|
|
|
|
|
|
|
|
|
|
|
|
 |
|
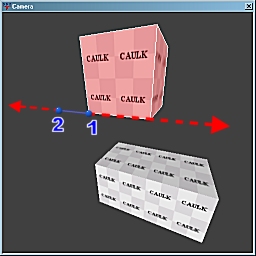
In the diagram to the side the clipper tool markers
(blue dots) are not on top of the selected brushwork.
However the brushwork is still being cut by the clipper
tool. This is because the clipper tool's cutting angle is extended
in both directions as far as the map limit goes.
The best way to understanding the clipper tool's cutting
system is to create a L shape with your left hand. Point your
index finger upwards and your thumb to the right (sideways).
Put your left hand where the first marker (blue dot) is on the screen
and then rotate your hand around until your thumb is pointing at the
second marker. (Turn your hand clockwise)
The direction your index finger is pointing is the default cutting
side, while your thumb is the cutting angle. This is why the bottom
section of the brush has been cut instead of the top.
|
|
|
|
|
|
|
|
|
|