|
|

|
|
All use of my digital work is covered by this
Creative Commons Deed.
Please do not use any of my work for commercial purposes, thank you. |
|
|
|
|
Rock Wall Templates (1 of 4)
|

|
|

|
|
|
|
|
 |
|
|
|
This collection of pictures and brief explainations is a step by step guide to creating a
low polygon rock walls.
With the right kind of detail and lighting this method should give an
adequate impression of freeform rock. The technique
described below can be scaled up or down in complexity so some areas
can appear higher in detail than others.
Also remember to use Phong Shading for the textures on
the rock walls. This will help to create the impression of more detailed and complex brushwork.
If you are unsure how to create or not aware what Phong shaders are, then please check the
following Link for more details.
The following page contains a snapshot of the brushwork
used in this article. If you want to create the brushwork while reading this article then I recommend having
a look at the sample map file and use it as a guide.
|
|
|
|
|
|
 |
|
|
|
|
|
|
|
|
|
|
 |
|
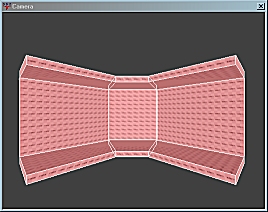
First decide on the basic layout for the rock work.
Create big caulk brushes of roughly where things are
to be placed. These big brushes are important because
they will be used later on by the compiler to block
"vis" in the map.
All of the rock/floor brushwork created will be setup
as "detail" brushes. Because of the various odd angles
of the rock work it would not be wise to create this from
"structural" brushes.
|
|
|
|
|
|
|
|
|
|
|
|
|
|
|
|
 |
|
Decide on the basic layout for the floor so that when
you create the rock walls it will be easier to know
which direction you need to go in.
It is recommended to vary the height of the floor so that
it does not feel like a flat concrete blob. Natural formations
are not gridlike and it is not unusual for the floor height
to be varied in caves.
Keep the floor height variantions gradual so the player does not
feel like they are on a rollercoaster while travelling past the
rock work.
|
|
|
|
|
|
|
|
|
|
|
|
|
|
|
|
 |
|
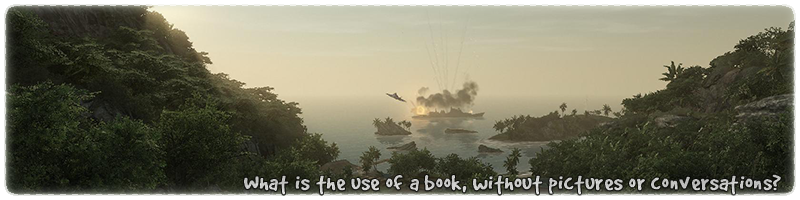
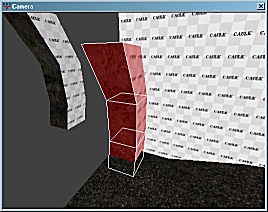
The next step is to decide on the wall template. This is a small
collection of "detail" brushes which will be varied up/down and
in/out from the caulk hull.
It is recommended to start with a few brushes at first and see how
it looks and feels. This system can be scaled up or down depending
on how much work you want to create for yourself.
A good starting point for a template would be 3 brushes.
Bear in mind, that the more complex the
template the higher the polygon count for the rock wall will be.
|
|
|
|
|
|
|
|
|
|
|
|
|
|
|
|
 |
|
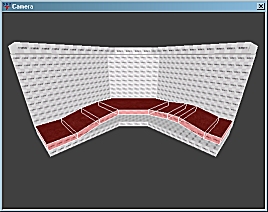
Once the template has been created, copy it by selecting all
the brushwork and pressing the "Spacebar" key. Move the
new brushwork into position where you want to start the
rock work.
Once the new brushwork has been twisted into position it
often quicker to copy the template for each new section.
Generally the template will be close by to
where you are creating the rock wall anyway.
|
|
|
|
|
|
|
|
|
|