|
|

|
|
All use of my digital work is covered by this
Creative Commons Deed.
Please do not use any of my work for commercial purposes, thank you. |
|
|
|
|
Rock Wall Detail (1 of 4)
|

|
|

|
|
|
|
|
 |
|
|
|
It is highly recommended that you read the article Rockwall Corridor
first. This article will expand on the previously discussed rockwork creation ideas and
show how to add additional detail by switching between different rock wall templates.
Adding detail to maps can be time consuming but if done in several different phases it can produce
better results. Coming back to a previous section of a map with a fresh focus or a brand new idea can often
give a bland area a much needed different brushwork style and direction.
Using the rock wall template method to 'flesh out' or create an initial pass of a rock cave / corridor
can be done very quick and easy. By coming back and adding different rock templates the original pattern
can be broken and the overall structure will start to feel more unique.
A few example of how different templates can be used, is by adding more cover or ducking spaces to corridors
or moving between low ceilings and wide open areas. The possible situations for breaking up the original template
style are endless and something which should not be overlooked.
As with all things in life there are many different ways of performing the same task. This articles was written
in such a way to try and minimize / avoid the use of vertex editing. In my experience this feature of the
editor can something produce damaged or broken brushwork and in a worst case scenario even crash the editor.
Personally I recommend storing all the rock templates as un-cut 'axially aligned' brushwork. Often
map routes will need to be change / tweaked for gameplay reasons and editing uniquely cut brushwork can be
frustrating. Having a reliable template around can save loads of time and effort if sections of the wall
need to be replaced or tweaked.
The following page contains a before and after snapshot of the brushwork
used in this article. If you want to create the brushwork while reading this article then I recommend having
a look at the sample map file and use it as a guide.
|
|
|
|
|
|
 |
|
|
|
|
|
|
|
|
|
|
 |
|
Using a simple brushwork template and twisting it in several different directions can quickly produce
nice looking organic rockwork.
The template method is very flexible and can be twisted around to fit most cave / corridor shapes. But
after a while the template can run out of 'up / down / in / out' variety and look too samey.
Often the rock texture will be using a Phong Shader to help smooth out
all the brushwork edges and give the illusion of more detail.
This extra smoothing of the light across the brushwork edges can also make template direction changes
seem very minor and subtle.
|
|
|
|
|
|
|
|
|
|
|
|
|
|
|
|
 |
|
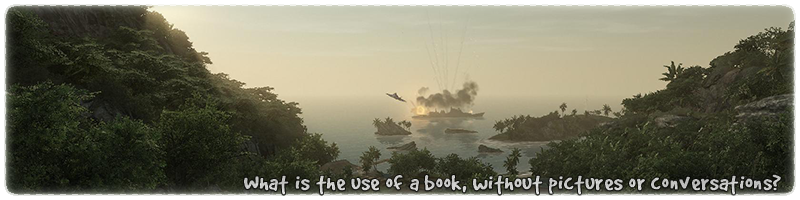
One good solution to this problem is to keep the Phong Shading angles
between 60-120 on the texture shader and then transform small or large sections of the rock work into
a new template.
The image to the side shows a new template section creating a bulge in the existing corridor rock
wall and adding some cover at the same time.
A new template could involve more segments, a different shape or even be spread out over several
different stages before reaching the final version. As long as the changes are noticeable and offers some visual /
gameplay benefit then its worthwhile.
|
|
|
|
|
|
|
|
|
|
|
|
|
|
|
|
 |
|
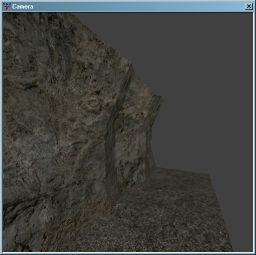
Take the original template and change the two lower segments to create a bulge in the rock
face. This will hopefully give the player some extra cover at ground level for ducking behind.
Next add a new segment in the middle of the new template so that its taller than the original one.
Changing the height of the ceiling is a good way of making the corridors feel more unique.
The new template should be noticeable different from the original one otherwise the work
involved in creating the transition will be pointless. The height transition should not be
too sudden otherwise the rock face will appear too stretch.
|
|
|
|
|
|
|
|
|
|
|
|
|
|
|
|
 |
|
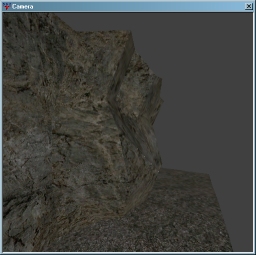
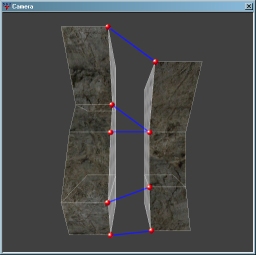
Once both templates have been created, line them up next to each other so that you can see where
the new segments will be.
In the diagram to the side the red dots are the points at which the segments
must connect to and the blue lines are the boundaries of each new brush.
It's better to create square shapes for the new segments between the two templates.
But if it is necessary then use triangle segments like the diagram to the side shows.
By working out where the segments are before creating any brushwork you can see how
to connect both templates together. After a while this will become easier to spot
and you will not have to plan out the connection so much.
|
|
|
|
|
|
|
|
|
|