|
|

|
|
All use of my digital work is covered by this
Creative Commons Deed.
Please do not use any of my work for commercial purposes, thank you. |
|
|
|
|
2 Point Clipping (2 of 4)
|

|
|

|
|
|
|
|
 |
|
|
|
 |
|
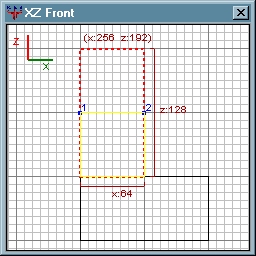
Make sure the 2D window is using the "Front" view ("CTRL+TAB") and
select the top part of the L shape. At this point we are only
interested in use one brush, so leave the bottom brush unselected.
Move the mouse cursor (in the 2D window) to where the first
blue dot is in the diagram to the side. When the mouse cursor
is in the right place, press and hold the "CTRL" key. Then click
once the Right Mouse Button (RMB).
To create the second marker for the clipper tool, use the
same procedure as above. Once both markers (blue dots)
are setup, the editor will show the results of
the clipper tool. The 2D and 3D windows should look
similiar to the diagram to the side and below.
|
|
|
|
|
 |
|
|
|
|
|
|
|
|
|
|
 |
|
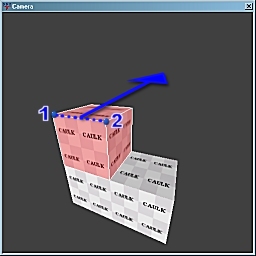
The 3D camera window does not draw the clipper tool markers
(blue dots) like in the diagram to the side. These extra
blue dots were added with Photoshop so that you
can get a better idea where they should be.
The clipper tool is slicing the brush across the middle
and away from the 2D window view. The cutting direction is
determined by which 2D window view (Front/Side/Top) is active.
The editor displays the changes to the brush differently
in each window. The 2D window shows the whole brush in
two colours. (red/yellow) The yellow section is what remains after
the cut. The 3D window just shows a final preview of the
clipper tool cut.
|
|
|
|
|
|
|
|
|
|
|
|
|
|
|
|
 |
|
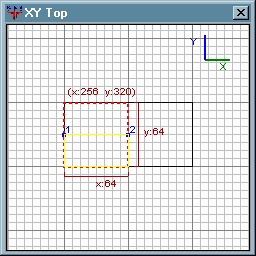
When using the clipper tool with two markers (blue dots)
the cut direction is always dependant on which 2D window
view (Front/Side/Top) is active.
As the 2D window view changes the yellow/red sections of the brush
will also change to reflect the new cutting angle. Unfortunately
the 3D window will not update unless the blue markers (blue dots)
or the camera location is moved.
By default the editor will create the clipper tool markers
(blue dots) at the middle of the brush unless another location
is specified. This is why the markers (blue dots) are in the middle
of the brush in the other 2D window views. (Side/Top)
Cycle round the 2D window ("CTRL+TAB") until the top view is
displayed like the diagram to the side.
|
|
|
|
|
|
|
|
|
|
|
|
|
|
|
|
 |
|
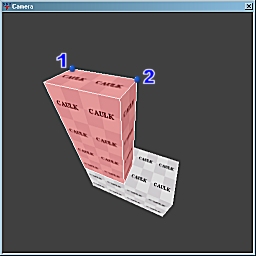
To update the 3D camera window press any one of the arrow keys
and the editor will display the new clipper tool preview.
As the diagram to the side shows the clipper tool's cutting angle
has changed direction and also the markers (blue dots) are now in
a new location !?!
In reality the markers (blue dots) have always been at this
location on the brush. The previous 2D window view
(Front) could not show them any other way, besides on the
front edge of the brush. The 2D window is exactly
what its says, 2 dimensional and will only show two axes at once.
Summary: The 2D window dictates which direction the
clipper tool will cut. The markers (blue dots) specify
the angle of the cut on the brush.
|
|
|
|
|
|
|
|
|
|