|
Flipper 1.5 - Levels Part 1 of 3 |
 |
|
|
|
 |
|
| |
|
|

|
|
All use of this game is covered by this
Creative Commons Deed.
Please do not use this game for any commercial purposes, thank you. |
|
|
 |
|
|
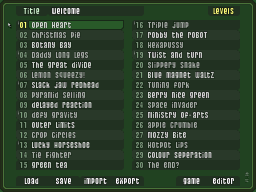
Introduction |
The game consists of 30 levels in one pack which are split into two sections of tutorials and freeform.
There are 7 tutorial sections with 3 levels in each which are roughly rated as easy, medium and hard.
Each special tile is introduced gradually across 3 individual levels and hopefully will demonstrate
some of the tricks found when using them.
|
|
|
Each level was designed to be completed between 30 seconds and a couple of minutes. This is a casual
content game designed to be picked up and played when there is a spare moment in the day, which is
why the levels are not overly complex. Level progression through the game is not locked in anyway and
the game actually features a skip and go to function, so that any level can be accessed quickly.
The freeform levels (22-30) at the end of the level pack are in no particular order of difficulty
and are simply fun puzzles based on tile colour shapes and themes.
All the levels within this game can be completed and often in several different ways. Next to each level
title on this page is a link to a solution presented as a series of grid co-ordinates. The game
shows the grid co-ordinate numbers in the top left hand corner when the mouse cursor is moved around.
The grid co-ordinate 9,9 means to use the Switch special tile, which should be directly under the
current game cursor.
|
|
 |
|
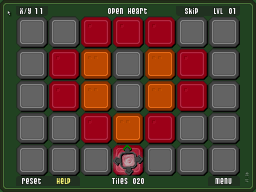
Tutorial 1, Level 1 is a gentle introduction to the game.
Featuring only 2 colour tiles and a simple route so not
to confuse anyone.
The level also teaches the circle method where you can clear
area's by swirling around in a circle. The 2 orange, 2 red
square area can be quickly cleared in a circle.
|
|
Tutorial 1 Level 2 is easy so that the player starts to feel confident
with the basic game mechanic's.
This level teaches the player to be careful of single red tiles as they
can easily become dead ends if not taken care of. The route around the
grid is linear because the progress is breadcrumb like.
|
|
|

|
 |
|
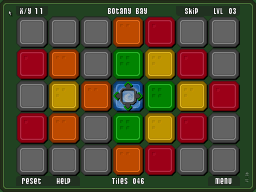
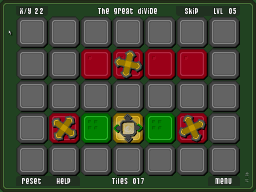
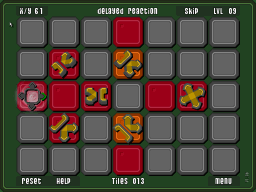
Tutorial 1 Level 3 is a large pile of tiles showing the player
the different colours and how many times they turn.
This level also demonstrates the initial limitation of the game, that all the tiles are
linked together in one long chain with very little possibility for complexity in layout.
It was at this point the special tiles were created to give the game more depth.
|
|
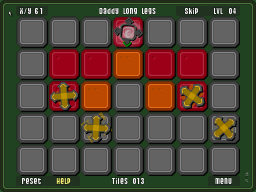
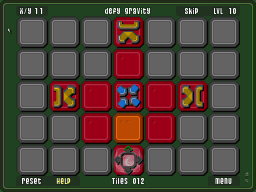
Tutorial 2 Level 1 introduces the first special tile called the Exploder.
The grid is split into two sides that can be completed both ways,
but one side is easier than the other. Are you a left or right person?
This level teaches that the Exploder can be used to reach other
special tiles that are not immediately available.
|
|
|
 |
 |
|
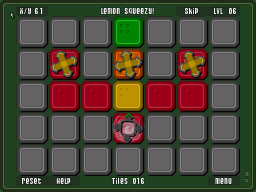
Tutorial 2 Level 2 is designed to teaches the player that the Exploder
special tile can be used to reach other sections of the grid.
The best way to deal with Exploder's is to sweep around in a big circle once
they have been used. It is very easy to leave behind red tiles which can become dead end's.
|
|
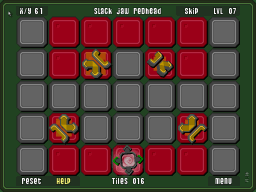
Tutorial 2 Level 3 is the first hard level in the game and during testing always
caught out every player. The level may look easy and symmetrical but it is top heavy.
This level was designed early on to prove to myself that the game
could make more than simple puzzles. It made me smile on countless occasions when
I saw people test this for the first time.
|
|
|
 |
 |
|
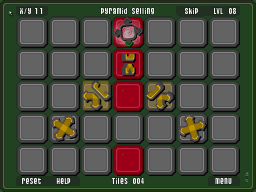
Tutorial 3 Level 1 is a very gentle introduction to the second
special tile called the Exploder Arc. The last
arc can be tricky if rushed but otherwise a nice relaxing
run to the end.
This level teaches that Exploder Arc's force the
player in certain directions and not as forgiving as the
basic Exploder which has many more route options.
|
|
Tutorial 3 Level 2 is a mixture of both Exploder types and
shows how the grid can be changed to open up new area's.
A very simple linear route from top to bottom but designed to build
up player confidence while working with multiple special tile types.
|
|
|
 |
 |
|
Tutorial 3 Level 3 is deceptive and was designed to slow the player down.
Very early on in development players would rush around the grid using all
the special tiles so that they only had to deal with colours.
As the title suggests one special tile has to be left to the end and the
trick is finding a path around the grid that also can come back.
|
|
Tutorial 4 Level 1 is short puzzle, but was really designed to show one
very important feature of the Vacuum special tile, that it can be
used to clean up tiles left behind.
The Vacuum special tile can be dangerous to use around red
coloured tiles because it can trap the player easily with no route to escape.
|
|
|
 |
|
|
|
|
|
 |
|
|
|


)
)
)
)
)
)
)
)
)
)
)
